Your Book (Portfolio)
The Rabbits Kitchen
My First Idea
I'm feeling uncertain about what to do for my final project at Ravensbourne. As it's my last project here, there's quite a bit of pressure on me to come up with something good. My current idea is to photograph flowers in still life. To better illustrate what I have in mind, I've created a mood board.
My Research
My First Mood Board


Link to my mood board- https://www.pinterest.co.uk/simimcpherson/your-book-portfolio/
Earlier, I mentioned that I struggled to come up with an idea for the project. Ellen assisted me in creating a mood board and generating an idea.
Artist's Research
I originally had different artists chosen for my first idea, but later changed my idea and had to find the artists who fit it.
Artist- Heather Barnes

1. A short text about where the photographer or photoshoot is from.
Heather Barnes was born in New Hampshire and is currently based in Austin, Texas.
2. How does the photographer work? I.E., do they work with fashion or music?
Heather Barnes is a commercial food photographer.
3. Where is their work featured, or where or who do they work for?
Heather Barnes work is featured in magazines like Ghirardelli, OONI, Bob’s Red Mill and Louis Jadot.
How is the image made?
1. What camera do you think is used? (35mm, Medium format? What type of lens?)
I think the camera they use is the NIKON D750 and the 24-70mm lens.
2. Is it a studio image or shot on location?
This was shot in a studio.
3. Was a flash used or natural lighting?
Flash was used for this shoot.
4. Is it a film or a digital image? If so, how is this expressed in the image?
I think this image was taken on a digital camera why because there is no graininess to the image and the image is sharp.
5. What models are in the image, and how are they posed?
In this image the models hands are posed holding a knife and fork at the bottom of the photo and the objects are posed random.
6. How is the image composed? What about the composition makes it striking?
The composition is random.
7. Is the image very clear, or is it slightly out of focus?
This image is very clear and in focus.
How is the image graded?
1. What tones are in the image? (i.e. heavy even tones? high contrast?)
This photo has mid tones and mid contrast.
2. What sort of colour is it? (i.e., highly saturated or unsaturated? Warm or cool tones?)
This photo has mid tones by the pink background and pink flowers used in this image.
3. Is the image very clean or edited to appear older?
This photo is very clean and is not edited to appear older.
4. Is there any texture to the image that makes it unique?
No texture.
Self-reflection
1. Talk here about how the image caught your eye and how you will use all the points above to improve your work. This image caught my attention because of the predominant pink colour and the flowers on the plate, resembling food. In the picture, a model is about to eat the floral dish. It's similar to what I want to achieve in my project, except that I won't include a human model in my photos.
Artist- Kateryna Pavlichenko (Katrin Leo Pako Photography)

1. A short text about where the photographer or photoshoot is from.
Kateryna Pavlichenko was born in Ukraine and is currently based in Los Angeles.
2. How does the photographer work? I.E., do they work with fashion or music?
Kateryna Pavlichenko is a commercial food, product photographer and stop motion.
3. Where is their work featured, or where or who do they work for?
Kateryna Pavlichenko work is featured in adverts like Drunk Elephant, ODYSSEY, Clinique and NYX Professional Makeup.
How is the image made?
1. What camera do you think is used? (35mm, Medium format? What type of lens?)
I think the camera they use is the NIKON D750 and the 24-70mm lens.
2. Is it a studio image or shot on location?
This was shot in a studio.
3. Was a flash used or natural lighting?
Flash was used for this shoot.
4. Is it a film or a digital image? If so, how is this expressed in the image?
I think this image was taken on a digital camera why because there is no graininess to the image and the image is sharp.
5. What models are in the image, and how are they posed?
There is one model which is an object and it is posed central.
6. How is the image composed? What about the composition makes it striking?
The composition is central.
7. Is the image very clear, or is it slightly out of focus?
This image is very clear and in focus.
How is the image graded?
1. What tones are in the image? (i.e. heavy even tones? high contrast?)
This photo has mid tones and mid contrast.
2. What sort of colour is it? (i.e., highly saturated or unsaturated? Warm or cool tones?)
This photo is warm tones by the beige and yellow colours used in the image.
3. Is the image very clean or edited to appear older?
This photo is very clean and is not edited to appear older.
4. Is there any texture to the image that makes it unique?
No texture.
Self-reflection
1. Talk here about how the image caught your eye and how you will use all the points above to improve your work. This image caught my eye because I want to do a photo like this in my book.
Artist- Tim Walker

1. A short text about where the photographer or photoshoot is from.
Tim Walker was born in England.
2. How does the photographer work? I.E., do they work with fashion or music?
Tim Walker is a fashion photographer.
3. Where is their work featured, or where or who do they work for?
Tim Walker work is featured in magazines like Vogue, W and Love.
How is the image made?
1. What camera do you think is used? (35mm, Medium format? What type of lens?)
Tim Walker uses a Pentax 67 film camera.
2. Is it a studio image or shot on location?
This was shot in a studio.
3. Was a flash used or natural lighting?
Flash was used for this shoot.
4. Is it a film or a digital image? If so, how is this expressed in the image?
I think this image was taken on a film camera as Tim Walker takes all of his photos in film as he thinks it digital camera limits the quality and especially the colour range of fashion photography.
5. What models are in the image, and how are they posed?
The item is posed central.
6. How is the image composed? What about the composition makes it striking?
The composition is central.
7. Is the image very clear, or is it slightly out of focus?
This photo is very clean and is not edited to appear older.
How is the image graded?
1. What tones are in the image? (i.e. heavy even tones? high contrast?)
This photo has low tones and low contrast.
2. What sort of colour is it? (i.e., highly saturated or unsaturated? Warm or cool tones?)
This photo is unsaturated and has neutral and cool tones because of the grey background and the how unsaturated the colours are in this photo.
3. Is the image very clean or edited to appear older?
This image is very clear and in focus.
4. Is there any texture to the image that makes it unique?
No texture.
Self-reflection
1. Talk here about how the image caught your eye and how you will use all the points above to improve your work. This image caught my attention because I want to do something like this in my book but I want more colour like pink and I would use more flowers.
Artist- Carly Tice

1. A short text about where the photographer or photoshoot is from.
Carly Tice is from New York.
2. How does the photographer work? I.E., do they work with fashion or music?
Carly Tice is a prop stylist and photographer.
3. Where is their work featured, or where or who do they work for?
Carly Tice work is featured in adverts like for Cirque Colors, AppleDoll, SCENT, Hawthorne and R+Co BLEU.
How is the image made?
1. What camera do you think is used? (35mm, Medium format? What type of lens?)
I think they camera they used was a Canon EOS Rebel SL2 and lens 100mm macro or105mm micro lens.
2. Is it a studio image or shot on location?
This was shot in a studio.
3. Was a flash used or natural lighting?
Flash was used for this shoot.
4. Is it a film or a digital image? If so, how is this expressed in the image?
I think this image was taken on a digital camera why because there is no graininess to the image and the image is sharp.
5. What models are in the image, and how are they posed?
The items are posed central.
6. How is the image composed? What about the composition makes it striking?
The composition is central.
7. Is the image very clear, or is it slightly out of focus?
This photo is very clean and is not edited to appear older.
How is the image graded?
1. What tones are in the image? (i.e. heavy even tones? high contrast?)
This photo has low tones and low contrast.
2. What sort of colour is it? (i.e., highly saturated or unsaturated? Warm or cool tones?)
This photo is neutral tones because of the background with a warm tones because of the yellow colour in the photo.
3. Is the image very clean or edited to appear older?
This image is very clear and in focus.
4. Is there any texture to the image that makes it unique?
No texture.
Self-reflection
1. Talk here about how the image caught your eye and how you will use all the points above to improve your work. This image caught my attention because I admire Carly Tice's work and this particular piece is unlike anything I've seen before. I am interested in creating something similar.
Artist- Vanessa Mckeown

1. A short text about where the photographer or photoshoot is from.
Vanessa Mckeown
2. How does the photographer work? I.E., do they work with fashion or music?
Vanessa Mckeown
3. Where is their work featured, or where or who do they work for?
Vanessa Mckeown
How is the image made?
1. What camera do you think is used? (35mm, Medium format? What type of lens?)
I think they camera they used was a
2. Is it a studio image or shot on location?
This was shot in a studio.
3. Was a flash used or natural lighting?
Flash was used for this shoot.
4. Is it a film or a digital image? If so, how is this expressed in the image?
I think this image was taken on a digital camera why because there is no graininess to the image and the image is sharp.
5. What models are in the image, and how are they posed?
The item is posed central.
6. How is the image composed? What about the composition makes it striking?
The composition is central.
7. Is the image very clear, or is it slightly out of focus?
This photo is very clean and is not edited to appear older.
How is the image graded?
1. What tones are in the image? (i.e. heavy even tones? high contrast?)
This photo has mid tones and mid contrast because of the almost black edge of the avocado to the background
2. What sort of colour is it? (i.e., highly saturated or unsaturated? Warm or cool tones?)
This photo is highly saturated with warm tones because of the pink background and the different colour sprinkles.
3. Is the image very clean or edited to appear older?
This image is very clear and in focus.
4. Is there any texture to the image that makes it unique?
No texture.
Self-reflection
1. Talk here about how the image caught your eye and how you will use all the points above to improve your work. This picture caught my attention due to its appealing color scheme and composition. I would like to create something avocado-themed, but I would replace the sprinkles with flowers.
My Second Mood Board


Equipment
Nikon D850 (my camera)
Nikon 50mm lens (this lens worked best and I mainly uses it for all of shoots)
Nikon 24-70mm lens
Shoot One- Test Shoot
Mood Board for Shoot One- Test Shoot


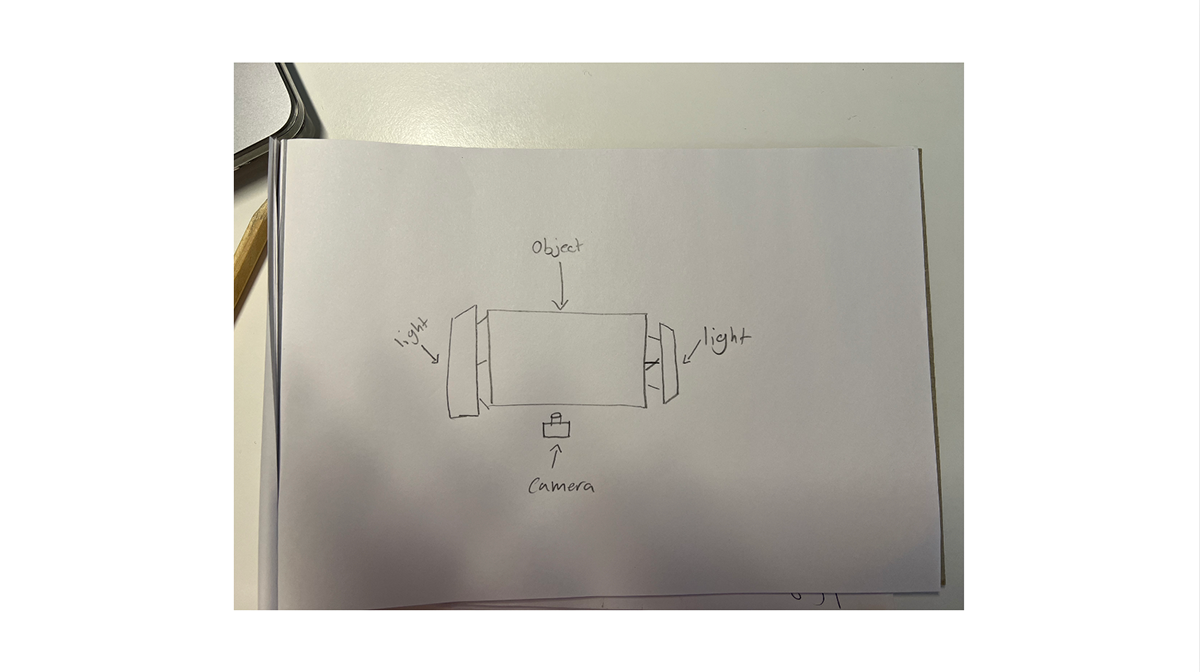
Lighting Diagram

Behind the Scenes

My Photos


For my first photo shoot for this project, I decided to conduct a test shoot. The purpose of this test shoot was to experiment with different camera settings, lighting setups, and lenses. Additionally, I tried different colour backdrops to see what would work best. Overall, I am glad I did this test shoot because I discovered that the colour backdrops I used were too strong and did not work well for my project. As a result, I need to purchase more colour backdrops that are more pastel in nature. I plan to visit Hobby Craft this week to buy the appropriate backdrops that will work for my project.
What I got at Hobby Craft

I recently went to Hobby Craft and picked up some supplies for my photo shoot. I got fake moss, a wet floral foam brick, fake flowers, barb wire, and backdrops in different colors. Additionally, I also purchased some dried flowers online, but unfortunately, they are not as great as I had expected them to be. Nevertheless, I plan to use them in my shoot.
Shoot Two
Mood Board for Shoot Two


Lighting Diagram

My Photos


For this photo shoot, I used the equipment that was supplied to me along with some old rusty cans that I found near a place where people dump their rubbish. I also bought some flowers from a corner shop nearby.
My second photo shoot went better than I expected. The photos turned out great and I am happy with the results. I used my new backgrounds which worked really well. I tried different colored backdrops such as coral and light green, but I found that grey and pink worked best for this shoot. I also experimented with different objects to put the flowers in, such as a glass cup that I had bought for a previous shoot and a record that I found at a charity shop that day.
Edited Photos


I only made light edits to these photos in Photoshop, mostly just cleaning them up and slightly enhancing the colors.
I watched these videos to help me with lighting as I want my photos to have a natural feel to them.
Notes- Ellen Nolans gave me a suggestion to where I could get flowers the floweriest is called Forest. Some artist to look into Roe Ethridge and Polly Brown.
Link- https://forest.london
Shoot Three
Mood Board for Shoot Three


Lighting Diagram

Behind the Scenes


My Photos


For this photoshoot, I had to purchase almost everything I needed to make it happen. I bought two glass panels, a plexiglass box and flowers on the day of the shoot.
I got the idea for this shoot while scrolling through Instagram and seeing a video someone had posted of their behind the scenes of a similar shoot. I really liked what I saw and wanted to recreate it. At first, it was a bit difficult because the lighting kept reflecting and showing on the glass. To solve this problem, I moved the light far back. Another issue I faced was that I hung my camera up to the ceiling, facing it down to my subject, but I had difficulty getting it to be straight and up. Unfortunately, I wasn't able to completely fix the issue, but I did the best I could. I would love to do this shoot again, but I need to research and find something else to hold my camera.
Edited Photos

I did very little editing to this photo of mine. I only cleaned it up a bit, brightened the colours, and cropped it in. I took the original photo from quite a distance away, which made it necessary to crop it in quite a bit. Next time, I'll make sure to take the photo from closer up so that I don't need to crop it as much and which made the photo smaller and this type of photo needs to be big. I used photoshop to edit the photos.
Shoot Four
Mood Boards for Shoot Four
Mood Board One


Mood Board Two


Lighting Diagram

Behind the Scenes


My Photos


For this photoshoot, I bought plenty of flowers and some expensive bread from a bakery nearby. The shoot turned out really well and I'm happy with how the photos came out. I experimented a lot with different flower placements, background colours, and setups. This time, I focused on flat lay photography which I had done before, but I wanted to try again since I had learned new techniques since my last attempt. One issue I faced during this shoot was shadows, which don't usually work well for flat lay photography. Also, changing the backdrops was a hassle since I had to remove everything. So, I decided to place the flowers on glass panels I had from a previous shoot and slide the backdrops in. This worked well, but I still had issues with shadows. To solve this, I placed the glass panels on blocks, which helped eliminate the shadows and made changing backdrops much easier.
Taking photos of the sandwich was a bit challenging at first because the bread wasn't visible, making it hard to tell that it was a sandwich. But as I kept shooting, I removed some flowers and played with angles, which ultimately led to some great photos. I'm satisfied with the final results.
My Editing Process

Edited Photos

I made very minimal adjustments to the photo, only cleaning it up, enhancing the colors, and cropping it slightly. I used photoshop to edit the photos.
Shoot Five
Mood Board for Shoot Five

Lighting Diagram
Behind the Scenes


My Photos


To prepare for the photo shoot, I purchased fake daisies and PVA glue from Hobby Craft. I made salt dough the night before the shoot. I used bowls from my house since my mother is fond of collecting them. Lastly, I wrapped an old cereal box in yellow paper for the background. I filled the bowl with salt dough and poured PVA glue into it. Then, I placed the daisies on top. I chose PVA glue over milk because it doesn't sink the flowers and holds them up. I also experimented with different colored backdrops and found that green works best. Overall, the shoot went smoothly, and it was the easiest one I've done so far.
Edited Photos

I made very minimal adjustments to this photo. I only cleaned it up by getting rid of the bubbles that the PVA glue made and also cleaned up the spoon. Additionally, I enhanced the colors such as the yellows in the daisies to make it clear that they are daisies. I edited these photos using photoshop.
Idea Change
I have changed my mind. After talking to Ellen and showing her my photos, she really liked my sandwich and cereal pictures and suggested that I continue with that theme. I really like this idea and look forward to shooting more images. Unfortunately, I only have a couple of weeks left before I need to send my photos to be printed into a book. So, I need to take a lot more pictures in a short period of time.
Mood Board


Link to my new mood board- https://www.pinterest.co.uk/simimcpherson/the-rabbits-kitchen-cook-book/

Recently purchased this to help me with my photography.
Shoot Six
Mood Board for Shoot Six


Lighting Diagram

Behind the Scenes


My Photos


To prepare for this shoot I need to pay avocados, bread and flowers with everything else i had already from home. I did three different mine shoot like avocado, cream cheese on crackers and avocado toast. This shoot want really well and I am happy with the way the shoot want and with how the photos came out. I did face some issue like the right angle and placment for the avocado toast it was a little tricky but I think I got the handle of it at the end.
Edited Photos


I made very minimal adjustments to the photo, only cleaning it up, enhancing the colors, and cropping it slightly. I used photoshop to edit these photos.
Shoot Seven
Mood Board for Shoot Seven


Lighting Diagram

Behind the Scenes


My Photos


Prior to the shoot, I had to prepare pea soup, salt dough, pizza dough, popcorn, and hard-boiled eggs. Additionally, I bought flowers. I had to do a lot of preparation to ensure I had everything I needed for the shoot. I did four different shoots for pea soup, popcorn, pizza, and a hard-boiled egg. The pizza shoot went really well and produced the best photo out of all the shots, as I only took eight photos of it. I am really happy with how all the photos turned out, but the pizza photo is my favorite, followed by the pea soup.
Edited Photos


I made very minimal adjustments to the photo, only cleaning it up, enhancing the colors, and cropping it slightly. I used photoshop to edit these photos.
Shoot Eight
Mood Board for Shoot Eight


Lighting Diagram

Behind the Scenes


My Photos


For this shoot, I had to buy salad, ice cream cones, flowers, pasta, and taco shells. Everything else I already had at home. I did six different shoots, including salad, taco, ice cream, pasta, chamomile tea, and cucumbers with cream cheese. I experimented a little bit with the salad, trying out two different bowls. I found that the wooden bowl worked better as I was shooting. The ice cream shoot was a little difficult for me because the flowers would not stay in the cone, making it challenging to shoot. However, I managed to get the shot in the end by using Blu-Tack to stick the flowers into place. My favourite shoot was the taco shoot because the photos came out really well and looked even better than I thought they would. It was also easy to do. Overall, the shoot went really well, and the photos came out great.
Edited Photos


I made very minimal adjustments to the photo, only cleaning it up, enhancing the colors, and cropping it slightly. I used photoshop to edit these photos.
Shoot Nine
Mood Board for Shoot Nine


Lighting Diagram

Behind the Scenes


My Photos


For my last and final shoot, I needed to buy doughnuts and make the icing, hotdog buns, and flowers. Later, for the ice cream sundae shoot, I would buy cherries. I also made the sushi the night before. I did four different shoots: doughnuts, sushi, ice cream sundae, and a corn dog. This shoot was the easiest, which I needed after doing five different shoots in two weeks. I had to send in my photos to be printed in a book. I'm really happy with the way all my photos came out. I think my favorite photos are the doughnuts; I think it has something to do with the hint of the colour purple and pink flowers I used on them. I need some simplicity in the photos, and the corn dog was fun to do as well.
Edited Photos


I made very minimal adjustments to the photo, only cleaning it up, enhancing the colors, and cropping it slightly. I used photoshop to edit these photos.
My Book


I looked up the recipes on the Internet and then put them into my InDesign layout for my book. I encountered extreme difficulty when trying to get my book set off to print. I had decided weeks ago to get my book printed by BobsBooks, but unfortunately, I had a hard time getting my layout onto their website. Despite calling them twice and emailing them for help, I had to look at other places to get my book printed. Fortunately, my dad has used a printing service called Mixam before, so I decided to use them. It was a lot easier to use and I got my prints done successfully.
Link to where I get my book printed from- https://mixam.co.uk/?nbt=nb%3Aadwords%3Ag%3A21069564478%3A159105471509%3A692389789834&nb_adtype=&nb_kwd=mixam&nb_ti=kwd-351655108052&nb_mi=&nb_pc=&nb_pi=&nb_ppi=&nb_placement=&nb_li_ms=&nb_lp_ms=&nb_fii=&nb_ap=&nb_mt=p&kw=mixam&device=c&placement=&devicetype=&gad_source=1&gclid=Cj0KCQjw_qexBhCoARIsAFgBlettWVIWT99ZaHHsgQIaCS52JpyjJseNxXEjpq5Gg0AC66Fpl40RKzsaAunNEALw_wcB
Conclusion
In conclusion, I faced a lot of challenges throughout this project, such as changing my concept just weeks before the deadline to send off my photos for printing into a book. Despite the time crunch, I am proud to have successfully pulled it off. The photos turned out great, and I am thrilled with the outcome. I encountered various challenges during the shoot, but I was able to overcome them and capture the desired results. Additionally, I faced difficulties with Bob's Books, which led me to explore other printing options. Despite these challenges, I have learned a great deal from this project and will apply this newfound knowledge to future endeavors. I am extremely pleased with the final product and how everything turned out. Starting with no clear concept in mind, I managed to develop an idea that not only exceeded my expectations but also brought me a sense of enjoyment throughout the process.


